Setting up SPF, DKIM, and DMARC in Hostinger is really just three TXT records added in one place: the DNS editor inside hPanel. The records themselves are identical no matter who hosts your DNS — SPF authorizes your senders, DKIM signs your mail, and DMARC sets the policy — so the only thing that is genuinely Hostinger-specific is where the editor lives and what you type in the Name field for each one. This guide walks that path, with the exact values coming from your email provider and the free generators rather than being guessed for you.
The short answer#
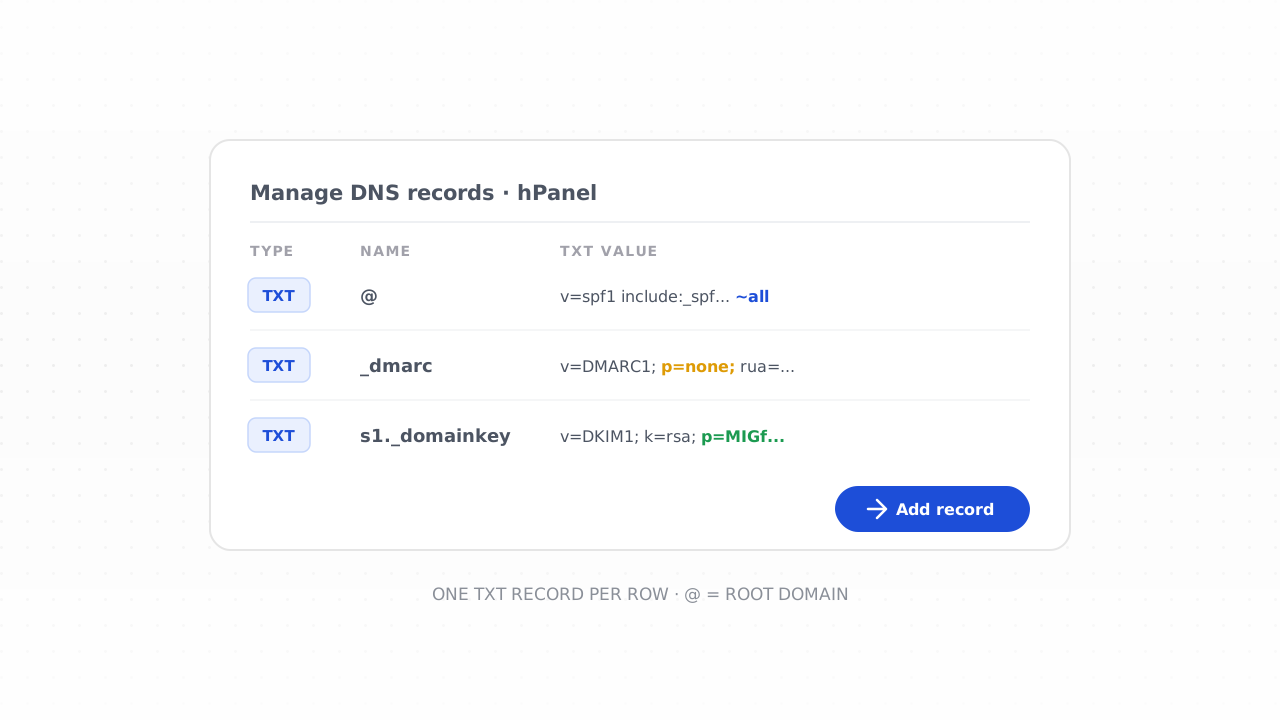
If your domain uses Hostinger's nameservers, you add all three records in hPanel → Domains → your domain → DNS / Nameservers → Manage DNS records. Each one is a TXT record, and the only field that changes between them is the Name (host):
- SPF — a TXT record at the root domain. Name field:
@. Value starts withv=spf1. - DKIM — a TXT record at a selector your email provider gives you. Name
field:
selector._domainkey(for examples1._domainkey). Value comes from the provider. - DMARC — a TXT record at the
_dmarchostname. Name field:_dmarc. Value starts withv=DMARC1.
For the conceptual picture of how the three fit together, read the SPF, DKIM, and DMARC explainer first. This article is the button-by-button version for Hostinger.
First, confirm Hostinger actually runs your DNS#
This is the step people skip, and it is the reason records sometimes "don't work." Editing DNS in hPanel only has any effect if your domain is using Hostinger's nameservers. If you registered the domain elsewhere, or pointed it at Cloudflare or another DNS provider, then the authoritative DNS lives there — and the TXT records you add in Hostinger are simply ignored.
In hPanel, open your domain and look at the Nameservers section. If it shows
Hostinger's own nameservers (typically ns1.dns-parking.com and
ns2.dns-parking.com, though this can vary), you are in the right place — add
your records in Hostinger. If it shows someone else's nameservers, go add SPF,
DKIM, and DMARC in that provider's DNS editor instead. You only manage DNS in
one place, and it has to be the place your nameservers point to.
Where Hostinger keeps your SPF, DKIM, and DMARC records#
Once you have confirmed Hostinger runs your DNS, the editor is a few clicks in:
- Log in to hPanel and open Domains.
- Select the domain you send mail from.
- Open DNS / Nameservers — this opens the DNS zone for the domain.
- Scroll to Manage DNS records. You will see a list of existing records and an Add new record form.
The add-record form has, at minimum, a Type dropdown, a Name field (sometimes labelled Host), a TXT value or Content field, and a TTL. For every record in this guide you leave Type set to TXT and leave TTL at its default — the default is fine for authentication records. The only fields that matter are Name and TXT value.
What goes in the Name field for each record#
The single most common mistake on Hostinger is putting the wrong thing in the
Name field. Here is the mapping, because it is where the host-specific naming
convention actually bites. Hostinger uses @ to mean the root domain, and it
appends your domain to whatever else you type — so you enter the short host
label, not the full hostname.
| Record | Name field in Hostinger | Resolves to |
|---|---|---|
| SPF | @ | the root domain, e.g. example.com |
| DMARC | _dmarc | _dmarc.example.com |
| DKIM | selector._domainkey | selector._domainkey.example.com |
Notice you never type your domain into the Name field — Hostinger adds it. If
you enter _dmarc.example.com you would end up with a record at
_dmarc.example.com.example.com, which resolves to nothing. Enter just
_dmarc.
Adding your SPF record in Hostinger#
SPF (Sender Policy Framework) lists the servers allowed to send mail as your domain. In the Add new record form:
- Type: TXT
- Name:
@ - TXT value: your SPF string, which always begins with
v=spf1and ends with anallmechanism.
A typical value looks like this:
v=spf1 include:_spf.google.com include:sendgrid.net ~all
Every provider you send through — Google Workspace, a marketing platform, a
transactional service, Hostinger's own email — needs its include: in this one
record. The ~all at the end is a soft-fail (accept but flag unauthorized
senders); -all is a hard-fail. Don't hand-assemble the string from memory: the
free SPF record generator builds a valid record
from the services you actually use and flags the mistakes that break SPF.
Adding your DKIM record in Hostinger#
DKIM (DomainKeys Identified Mail) publishes a public key so receivers can verify the cryptographic signature on your mail. The important thing to understand: the DKIM selector and value come from your email provider, not from Hostinger. Whoever sends your mail — Google Workspace, Zoho, an ESP, or Hostinger's email service — generates the key pair and tells you the exact selector name and the public-key string to publish.
Your provider will give you something like a selector s1 (or google,
hs1, dkim, etc.) and a value beginning v=DKIM1. In Hostinger's form:
- Type: TXT
- Name: the selector plus
._domainkey, for examples1._domainkey - TXT value: the exact string your provider gave you
s1._domainkey TXT v=DKIM1; k=rsa; p=MIGfMA0GCSqGSIb3DQ...
Copy the value verbatim — a single altered or dropped character breaks the signature. If your provider hands you a very long key, Hostinger's field accepts it; just paste the whole thing without adding line breaks or quotation marks. Because the selector is chosen by your provider, always use the one they specify rather than inventing your own.
Adding your DMARC record in Hostinger#
DMARC (Domain-based Message Authentication, Reporting and Conformance) is the
policy layer that ties SPF and DKIM to the visible "From" address and tells
receivers what to do when a message fails. It is a single TXT record at the
_dmarc hostname:
- Type: TXT
- Name:
_dmarc - TXT value: your DMARC policy, starting with
v=DMARC1
Start in monitoring mode — p=none — so you break nothing while you watch:
v=DMARC1; p=none; rua=mailto:dmarc@example.com
The rua= address is where the daily aggregate reports are sent; point it at a
mailbox you can read. Build the value with the
free DMARC record generator so the tags are
formatted correctly, then paste it into the TXT value field.
The full monitoring-to-enforcement sequence — how long to wait, what to look for in the reports, when to raise the policy — is covered in the step-by-step DMARC setup guide. That process is identical regardless of where your DNS is hosted.
Verify the records resolved#
Hostinger applies DNS changes fairly quickly, but propagation across the internet can still take anywhere from a few minutes to a few hours, so don't panic if a lookup comes back empty right after you save. Once it has had time to settle, confirm all three at once with the SPF, DKIM, and DMARC checker — paste your domain (and your DKIM selector) and it reports whether each record is found and well-formed. That is the fastest way to catch the classic Hostinger slips: a domain accidentally appended in the Name field, a second SPF record, or a DKIM selector that doesn't match what your provider signs with.
If a record doesn't show up, re-check three things in order: that Hostinger's
nameservers are the ones actually serving the domain, that the Name field holds
the short label (@, _dmarc, or selector._domainkey) and not the full
hostname, and that you didn't wrap the value in extra quotes.
Common Hostinger mistakes#
A handful of errors account for most broken setups on Hostinger specifically:
- Editing DNS in Hostinger when the nameservers point elsewhere. The records save but do nothing. Confirm the nameservers first.
- Typing the full hostname in Name. Use
@,_dmarc, orselector._domainkey— Hostinger appends your domain automatically. - Two SPF records. Adding a fresh
v=spf1TXT when one already exists breaks SPF for the whole domain. Merge into one. - Editing the DKIM value by hand. The public key must match your provider's private key exactly; paste it unaltered.
- Enforcing DMARC on day one.
p=rejectbefore monitoring is how you bury your own invoices and newsletters. Start atp=none.
Getting these right is table stakes now, not a nice-to-have: the Google and Yahoo sender requirements make SPF, DKIM, and DMARC mandatory for bulk senders, and correct authentication is what protects your sender reputation from spoofing.
Frequently asked questions#
Where do I add SPF, DKIM, and DMARC records in Hostinger?#
In hPanel, go to Domains, select your domain, open DNS / Nameservers, and
scroll to Manage DNS records. Use the Add new record form with Type set
to TXT for all three. Set the Name field to @ for SPF, _dmarc for DMARC,
and selector._domainkey for DKIM, then paste each value. This only works if the
domain is using Hostinger's nameservers; menu labels may differ slightly as
hPanel is updated.
What do I put in the Name (host) field on Hostinger?#
Enter the short host label, never the full hostname — Hostinger appends your
domain for you. Use @ for the root SPF record, _dmarc for the DMARC record,
and your provider's selector followed by ._domainkey (such as s1._domainkey)
for DKIM. Typing example.com into the Name field produces a doubled hostname
like _dmarc.example.com.example.com that resolves to nothing.
Where do the SPF and DKIM values come from?#
The values are determined by your email provider, not by Hostinger. Your DKIM selector and public key are generated by whoever sends your mail — Google Workspace, an ESP, or Hostinger email — and must be copied exactly. For SPF, use the SPF record generator to build one correct record from every service you send through, and the DMARC record generator for a valid starting policy.
Why isn't my Hostinger DNS record working?#
Most often the domain isn't actually using Hostinger's nameservers, so the records you added aren't authoritative — check the Nameservers section first. Other common causes are a full hostname in the Name field instead of the short label, a duplicate SPF record, or simply DNS not having propagated yet. Confirm with the SPF, DKIM, and DMARC checker once a little time has passed.
Authentication proves your mail is really yours, but it is only the entry ticket to the inbox — a perfectly signed message to a list full of dead addresses still bounces and still lands in spam. Run your list through the free email checker to strip invalid addresses before they hurt the reputation your new SPF, DKIM, and DMARC records are meant to protect.