If your domain is registered with IONOS (formerly 1&1 IONOS), all three of your
email-authentication records — SPF, DKIM, and DMARC — live in the same place: the
DNS section of your IONOS control panel. Each one is an ordinary TXT record;
what changes between them is the host name you file it under and where the value
comes from. This guide shows exactly where IONOS keeps that editor, what to type
in the host field for the root domain, _dmarc, and your DKIM selector, and how
to confirm the records once they take effect. For how the three records fit
together conceptually, see the
SPF, DKIM, and DMARC explainer;
this article is the IONOS-specific how-to.
The short answer#
You will add three TXT records in the same IONOS DNS editor:
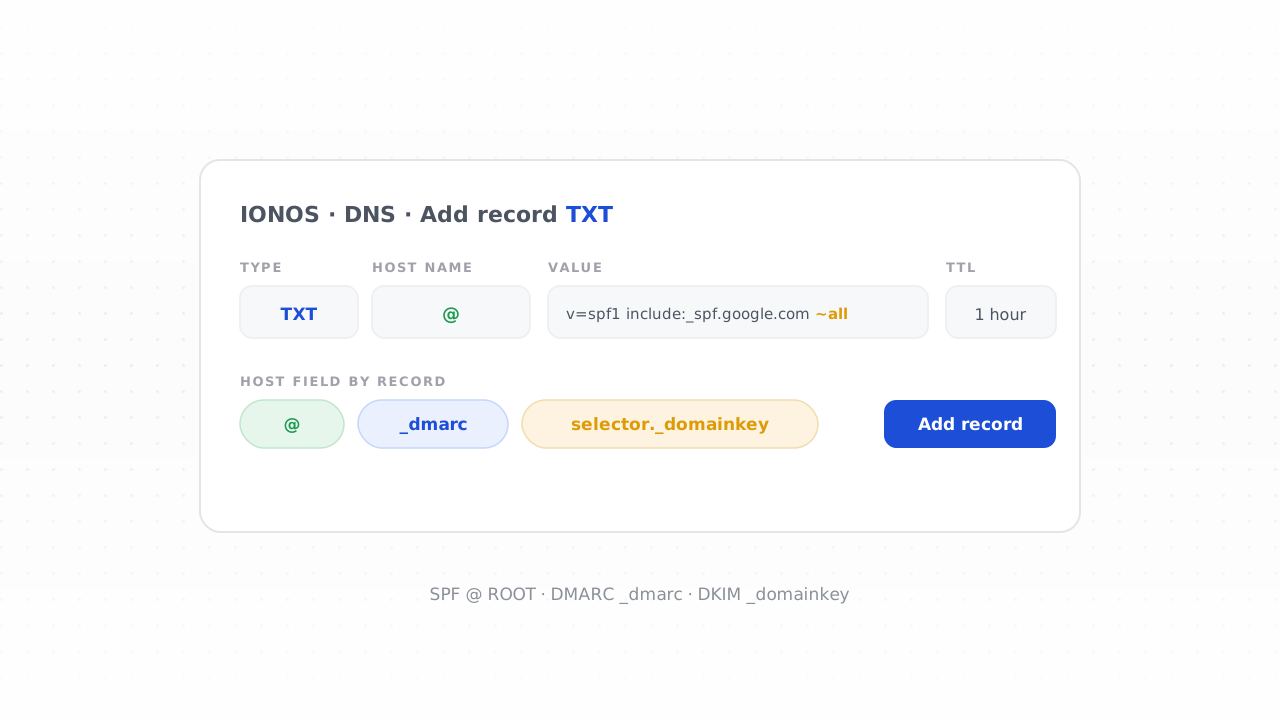
- SPF — one TXT record at the root of your domain (host
@or left blank), value startingv=spf1, listing every service allowed to send as you. - DKIM — one TXT record at
selector._domainkey, where the selector name and the long public-key value both come from your email provider (Google Workspace, Microsoft 365, SendGrid, and so on). You never invent this value. - DMARC — one TXT record at
_dmarc, value startingv=DMARC1, beginning atp=noneso you can monitor before you enforce.
The records themselves are identical no matter who hosts your DNS — the only IONOS-specific part is where the editor lives and what goes in the host field. That is what the rest of this guide covers.
Where IONOS keeps your DNS records#
IONOS puts DNS management under your domain rather than in a standalone DNS dashboard, so the path runs through the domain list. After you log in to your IONOS account:
- Open the main menu and go to Domains & SSL (older accounts may label this simply Domains).
- In the list of domains, click the one you want to configure — or the gear / settings icon next to it.
- Choose the DNS tab or section for that domain. This opens the record table showing your existing A, MX, CNAME, and TXT entries.
- Click Add Record (sometimes shown as Add or a +), and pick TXT as the record type.
IONOS control-panel labels and layout change from time to time, so the exact wording or the position of a button may have moved since this was written — but the sequence is always the same: find the domain, open its DNS records, add a new TXT record. If you see a dedicated SPF record type in the dropdown, you can ignore it; a plain TXT record is the universally supported choice and keeps all three records consistent.
Each new TXT record asks for three things: a Host name (sometimes just Host or Name), a Value (the record text), and a TTL. The TTL is how long resolvers cache the record; IONOS defaults it to 1 hour, and that default is fine. You can drop it to 10 minutes while you are actively testing so changes show up faster, then leave it at the default afterwards.
Setting up SPF in IONOS#
SPF (Sender Policy Framework) is the single TXT record that lists which servers may send mail using your domain. In the IONOS record editor, add a TXT record with these fields:
- Host name:
@— this is how IONOS refers to the root (bare) domain. If IONOS rejects@or the field description says to leave it empty for the root, a blank host name works too. Do not put your full domain here. - Value: your SPF string, which always begins with
v=spf1and ends with anallmechanism. - TTL: leave at 1 hour.
A typical value looks like this — but yours depends entirely on which services you send through:
v=spf1 include:_spf.google.com include:sendgrid.net ~all
The ~all at the end is a soft-fail (accept but flag unauthorized senders);
-all is a hard-fail (reject them outright). Every sending service you use —
your email host, your marketing platform, your CRM, your invoicing tool — needs
its include: in this one string. Because the value has to be assembled
correctly, build it with the
SPF record generator rather than by hand.
Setting up DKIM in IONOS#
DKIM (DomainKeys Identified Mail) publishes a public key that lets receivers verify each message was signed by you and not altered in transit. Both the selector and the key value are generated by your email provider, so the first step happens outside IONOS: enable DKIM in your provider's admin console (Google Workspace, Microsoft 365, your ESP's authentication settings) and copy the host and value it gives you.
The provider will hand you a host that looks like
selector1._domainkey.yourdomain.com and a long value beginning with v=DKIM1.
In IONOS, add a TXT record:
- Host name: the selector part only, without your domain — for example
selector1._domainkeyorgoogle._domainkey. IONOS appends your domain automatically, so entering the fullselector1._domainkey.yourdomain.comwould double it up. Strip the trailing.yourdomain.comfrom what your provider showed you and paste the rest. - Value: the entire public key string from your provider, exactly as given —
something like
v=DKIM1; k=rsa; p=MIGfMA0GCSq...(usually much longer). - TTL: leave at 1 hour.
Two things trip people up here. First, the selector name is whatever your
provider chose — google, selector1, s1, k1, a random string — so use the
exact one from its instructions rather than guessing. Second, DKIM values are
long; paste the whole thing in one go and check you did not clip the start or the
end. Some providers give you a CNAME instead of a TXT record for DKIM; if so,
add it as a CNAME in the same IONOS editor with the host and target they
specify, and skip the TXT for DKIM entirely.
Setting up DMARC in IONOS#
DMARC (Domain-based Message Authentication, Reporting and Conformance) is the
policy record that ties SPF and DKIM to the visible "From" address and tells
receivers what to do when a message fails. It always lives at the fixed host
_dmarc. In the IONOS editor, add a TXT record:
- Host name:
_dmarc— nothing more. IONOS appends the domain, giving_dmarc.yourdomain.com. - Value: a DMARC string beginning with
v=DMARC1, starting in monitoring mode. - TTL: leave at 1 hour.
A safe starting value looks like this:
v=DMARC1; p=none; rua=mailto:dmarc@yourdomain.com
The p=none means "take no action yet, just report." The rua= address is
where the daily aggregate reports are sent — point it at a mailbox you actually
read. Build the value with the
DMARC record generator so the tags are correct,
then follow the full rollout in the
step-by-step DMARC guide: stay at p=none for a
couple of weeks, read the aggregate reports
until every legitimate stream authenticates in alignment, then tighten to
p=quarantine and finally p=reject. Never publish p=reject on day one — you
will send your own mail to spam before you learn which streams were failing.
Verify the records after they propagate#
DNS changes in IONOS are usually visible within minutes but can take up to an hour to fully propagate, in line with the TTL. Once you have added all three records, confirm they resolve correctly with the SPF, DKIM, and DMARC checker — it looks up all three at once and flags a missing record, a syntax error, or a duplicate SPF entry. If a record does not show up yet, wait for the TTL to lapse and check again before assuming it is wrong.
Getting all three green is what satisfies the Google and Yahoo sender requirements and protects your sender reputation from spoofing. But authentication only proves who you are — it does not make you a good sender. A perfectly authenticated message to a list full of dead addresses still lands in spam, so pair clean records with a clean list.
Common pitfalls in IONOS#
- Putting the full domain in the host field. IONOS appends your domain
automatically. Enter
@for the root SPF,_dmarcfor DMARC, andselector._domainkeyfor DKIM — not the fullsomething.yourdomain.com. - Two SPF records. Only one
v=spf1record may exist at the root. If IONOS already shows an SPF or TXT record from a previous setup, edit that one instead of adding a second. - Guessing the DKIM value. The selector and key come from your email provider. There is no generic DKIM value to paste — if you have not enabled DKIM in your provider's console yet, do that first.
- Jumping DMARC straight to enforcement. Start at
p=none, monitor, then step up. Enforcement without the monitoring phase is the fastest way to bury legitimate mail. - Not waiting for TTL. A record can look "missing" simply because the old cached answer has not expired. Give it up to an hour before troubleshooting.
Frequently asked questions#
Where do I add SPF, DKIM, and DMARC records in IONOS?#
Log in to IONOS, open Domains & SSL, click your domain, and open its DNS
section. Use Add Record → TXT for each one. Labels and layout can shift
between IONOS interface versions, so a button may have moved, but the path always
runs through the domain's DNS record list. Set the host to @ (or blank) for
SPF, _dmarc for DMARC, and your provider's selector._domainkey for DKIM.
What do I put in the IONOS host or name field for each record?#
For SPF, enter @ for the root domain — or leave the host blank if IONOS
prefers that for the root. For DMARC, enter _dmarc. For DKIM, enter only the
selector portion your provider gave you, such as selector1._domainkey or
google._domainkey. In every case IONOS appends your domain automatically, so
never type the full something.yourdomain.com into the host field.
Where does the DKIM value come from in IONOS?#
Not from IONOS. You enable DKIM inside your email provider's admin console (Google Workspace, Microsoft 365, your ESP), and it generates the selector and the public-key value for you. You then paste that value into a TXT record in IONOS. IONOS only hosts the record — the key itself is issued by whoever sends your mail.
How long do IONOS DNS changes take to work?#
Usually a few minutes, but allow up to an hour for full propagation, matching the TTL. IONOS defaults the TTL to 1 hour; you can lower it to around 10 minutes while testing so changes appear faster, then leave it at the default. If a record does not show up right away, wait for the TTL to lapse before assuming something is wrong, then re-run the checker.
Set the three records correctly in IONOS and providers will trust your identity — but a trusted identity only earns the inbox when the list behind it is clean. Run your addresses through the free email checker to strip out dead mailboxes and typos before they bounce, and reach for the free deliverability tools whenever you need to generate or re-check a record.