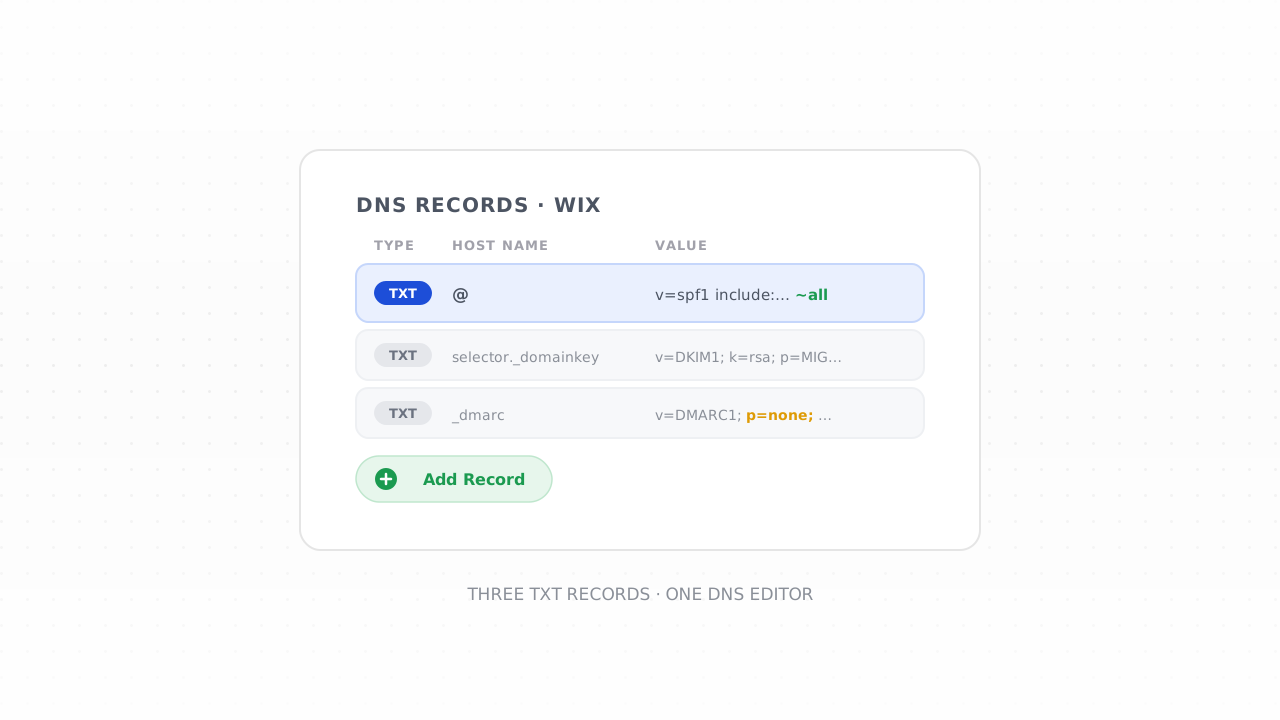
Setting up SPF, DKIM, and DMARC in Wix comes down to publishing three TXT records in the same DNS editor — but only if Wix is the one actually managing your domain's DNS. The records themselves are identical no matter who hosts your DNS: SPF and DMARC live at fixed locations, and DKIM comes from whichever email provider you send through. What changes from host to host is where the DNS editor lives and what you type in the host/name field. This guide walks through both in the Wix dashboard, with one important caveat about connected versus pointed domains that trips up a lot of Wix users.
The short answer#
If your domain is connected to and managed by Wix (using Wix nameservers), all three records go in the same place: your Wix account → Domains → select the domain → the DNS Records / Manage DNS area → Add Record → TXT. You add three TXT records with different host names:
- SPF — one TXT record at the root of your domain (host
@), value startingv=spf1. - DKIM — one TXT record at
<selector>._domainkey, with the selector and value supplied by your email provider. - DMARC — one TXT record at
_dmarc, value startingv=DMARC1, beginning atp=none.
Wix's DNS interface has been redesigned more than once, so the exact labels and menu paths below may have shifted by the time you read this — the concepts (add a TXT record, set the host name, paste the value) are what stay constant. For how the three records fit together conceptually, see the SPF, DKIM, and DMARC explainer.
First, check: is your domain connected to Wix or just pointed?#
This is the single most important step for Wix users — skipping it is why people add records that never take effect. Wix attaches a domain in two ways, and each puts your DNS controls in a different place.
- Connected (nameservers method). Your domain uses Wix's nameservers, so Wix is the authoritative DNS host. This is the case where you edit SPF, DKIM, and DMARC inside the Wix dashboard, using the steps in this guide.
- Pointed (pointing method). Your domain stays with your original registrar (GoDaddy, Namecheap, and so on) and only an A record or CNAME points visitors at your Wix site. Here, Wix is not managing your DNS — your registrar is. You must add the TXT records in that registrar's DNS panel instead, and any TXT records you add inside Wix will simply be ignored.
The rest of this guide assumes the domain is connected to Wix. If it's pointed, the record values are identical — only the DNS panel you type them into differs.
Where Wix keeps your DNS records#
Sign in to your Wix account and open Domains from the account menu. Select the domain you send email from, then look for the DNS Records section — depending on your account it may be labelled Manage DNS or Advanced. That screen shows a table of your current records grouped by type (A, CNAME, MX, TXT, and so on).
Each Wix DNS record has three fields you'll care about:
- Host Name — what goes to the left of your domain. For the root of the
domain you use
@; for a subdomain-style record you enter the prefix, like_dmarcorselector1._domainkey. - Value (sometimes shown as Data or Points to) — the record content
you paste in, for example the whole
v=spf1 …string. - TTL — how long resolvers cache the record. The default is fine; leave it unless you have a reason not to.
To create a record you click Add Record, choose TXT as the type, and fill in Host Name and Value. That's the same three-step motion for all three records — only the Host Name and the Value change.
Adding your SPF record in Wix#
SPF is a single TXT record at the root of your domain that lists every
service allowed to send mail as you. In Wix's Host Name field, the root is
represented by @.
Add a TXT record, set Host Name to @, and paste your SPF value. It always
begins with v=spf1 and ends with an all mechanism. A record that authorizes
Google Workspace and one ESP looks like this:
v=spf1 include:_spf.google.com include:sendgrid.net ~all
The ~all at the end is a soft-fail (accept but mark suspicious); -all is a
hard-fail. Don't copy the example above verbatim — the include: entries have
to match your actual senders. Every mailbox and marketing provider you use
publishes the include: value it needs, and the safe way to assemble them into
one correct string is the SPF record generator,
which merges your senders and flags mistakes.
Adding your DKIM record in Wix#
DKIM is where your email provider does most of the work — you're just publishing the public key it gives you. Wix does not generate this value; it comes from wherever you actually send mail (Google Workspace, Microsoft 365, or your ESP's authentication settings). Turn on DKIM there first and the provider hands you a selector and a value.
The record's Host Name follows a fixed pattern —
<selector>._domainkey — where <selector> is the exact label your provider
gave you. In Wix, add a TXT record and set Host Name to something like:
selector1._domainkey
Then paste the provider's value into the Value field — it usually looks like
v=DKIM1; k=rsa; p=MIGfMA0… followed by a long public key. Two Wix-specific
things to watch:
- Enter only the prefix in Host Name. Because Wix appends your domain
automatically, you enter
selector1._domainkey, notselector1._domainkey.yourdomain.com. - Some providers hand you a CNAME instead of a TXT. Google Workspace uses a TXT record for DKIM, but a few ESPs ask you to add one or more CNAME records that point at keys they host. If yours does, choose CNAME (not TXT) as the record type in Wix and paste their target as the value.
Copy the selector and value exactly as your provider shows them. A single altered character means the signature won't verify.
Adding your DMARC record in Wix#
DMARC is a TXT record at the fixed host _dmarc. Add a TXT record, set Host
Name to _dmarc, and paste a starter policy. The safe first value is:
v=DMARC1; p=none; rua=mailto:dmarc@yourdomain.com
p=none means "monitor only, take no action" — it changes nothing about how
your mail is handled but switches on the daily aggregate reports that tell you
which senders are passing. That reporting is the whole point of starting here.
Build your record with the
DMARC record generator so the tags are valid,
then follow the staged rollout in our
step-by-step DMARC setup guide: stay at p=none
until the reports show every legitimate stream authenticating, then move up to
p=quarantine and finally p=reject.
Once the reports start arriving, our guide to reading DMARC aggregate reports explains how to turn the raw XML into a list of what to fix before you enforce.
Verify the records resolved#
DNS changes in Wix usually take effect quickly, but propagation can take up to a couple of hours. Don't judge your work by the Wix table alone — confirm the records are live on the public internet.
The fastest check is the SPF, DKIM, and DMARC checker: enter your domain (and your DKIM selector) and it reports whether each record is found, valid, and correctly formed. Look for three green results:
| Record | Wix Host Name | What to confirm |
|---|---|---|
| SPF | @ | Exactly one v=spf1 record, all your senders included |
| DKIM | selector._domainkey | Key found at your provider's selector, signature verifies |
| DMARC | _dmarc | One v=DMARC1 record, starting at p=none |
If a record doesn't show up, give it more time, then re-check that the Host Name has no trailing domain and the value has no stray spaces or smart quotes pasted in from a document.
Common Wix pitfalls#
A handful of mistakes account for most broken setups on Wix:
- Editing DNS in Wix when the domain is only pointed. The number-one Wix issue. If your domain is pointed rather than connected, records added in Wix do nothing — you must edit them at your registrar. Confirm which method you're on before you touch anything.
- Two SPF records. If Wix or your provider already added a
v=spf1record at the root, merge your senders into it rather than adding a second one. - Inventing the DKIM value. The selector and public key come only from your email provider's authentication settings. There's nothing to generate on the Wix side.
- Enforcing DMARC too early.
p=rejectbefore monitoring buries legitimate mail. This matters more now that the Google and Yahoo sender requirements make DMARC mandatory for bulk senders — but the requirement is a published policy, whichp=nonesatisfies while you ramp safely. - Assuming authentication equals deliverability. Passing all three proves who you are; it doesn't make you a good sender. A perfectly authenticated domain with a poor sender reputation or a dirty list still lands in spam.
Frequently asked questions#
Where do I add SPF, DKIM, and DMARC records in Wix?#
If your domain is connected to and managed by Wix, go to your Wix account →
Domains → select the domain → the DNS Records / Manage DNS area →
Add Record → TXT. Add SPF at Host Name @, DKIM at
<selector>._domainkey, and DMARC at _dmarc. The menu labels can differ
slightly between Wix account versions, but the flow is the same: add a TXT
record, set the Host Name, and paste the value.
Why aren't my DNS records working in Wix?#
The most common reason on Wix is that your domain is pointed rather than connected. If you only pointed the domain, your registrar still controls DNS and any records you add inside Wix are ignored — you have to add them in the registrar's DNS panel instead. Check the domain's connection method in your Wix account first. The other frequent cause is typing the full domain in the Host Name field when Wix appends it for you.
What do I put in the Host Name field for the root domain in Wix?#
Use @. In Wix's DNS editor, @ represents the root of your domain, which is
exactly where the SPF record belongs. For DMARC you enter _dmarc and for DKIM
<selector>._domainkey — in every case you enter only the prefix, because Wix
adds your domain automatically. Don't append .yourdomain.com yourself.
Do I create the DKIM value inside Wix?#
No. Wix only stores the record — it doesn't generate DKIM keys. You turn on DKIM in your email provider (Google Workspace, Microsoft 365, or your ESP), and it gives you the selector and the public-key value to publish. You then add that as a TXT (or, for some providers, CNAME) record in Wix exactly as the provider shows it.
Once your three records verify green, the authentication half of deliverability is done — but a trusted identity only earns the inbox if the list behind it is clean. Run your list through the free email checker to strip dead addresses and typos before they bounce, or explore the full set of free deliverability tools to keep SPF, DKIM, and DMARC healthy over time.