Cloudflare is one of the most popular places to manage a domain's DNS, and
setting up SPF, DKIM, and DMARC there comes down to adding three TXT records in
the right place with the right names. The records themselves are identical no
matter who hosts your DNS — what changes from host to host is where the editor
lives and what you type in the name field. This guide covers exactly that for
Cloudflare: how to reach the DNS record editor, what to enter in the Name field
for the root domain, the DKIM selector, and _dmarc, plus the Cloudflare-
specific details worth knowing — like the fact that the orange proxy cloud never
touches TXT records at all.
The short answer#
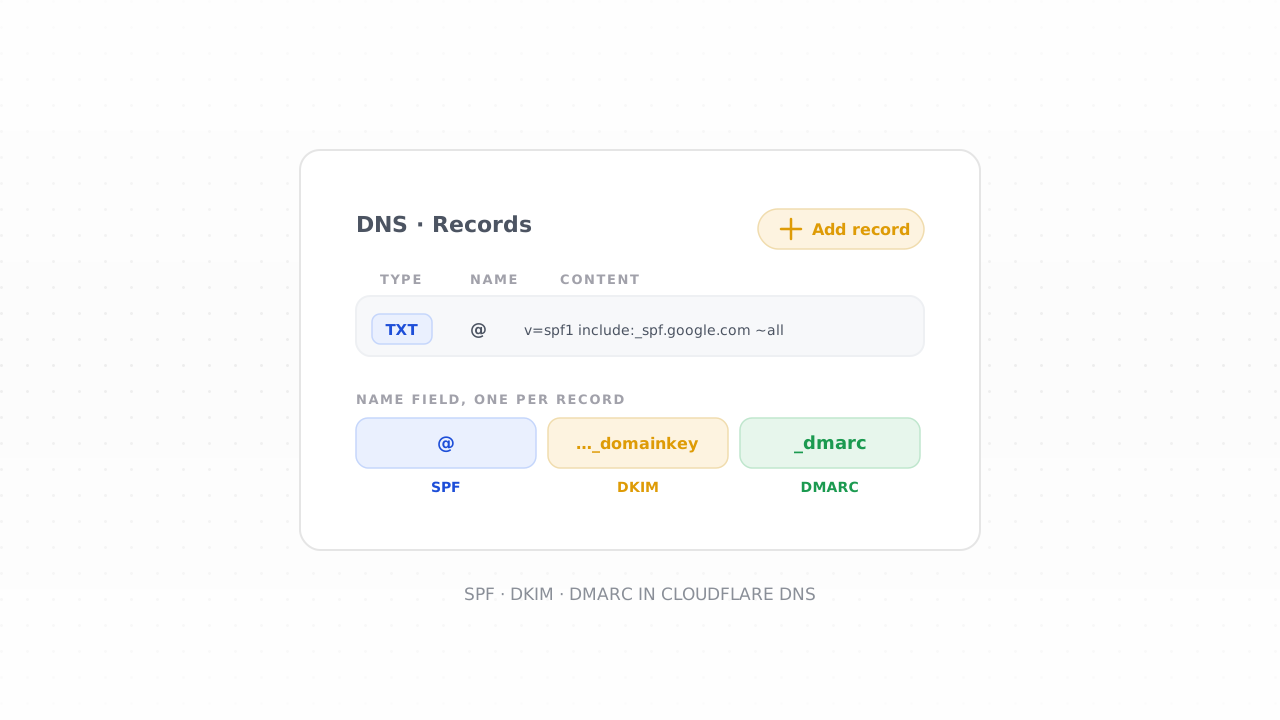
All three authentication records are TXT records you add under DNS → Records in the Cloudflare dashboard. The only things that differ between them are the Name field and where the value comes from:
- SPF — Name
@(your root domain). Value starts withv=spf1and lists the services allowed to send for you. Publish exactly one SPF record. - DKIM — Name
<selector>._domainkey. The selector and the long public-key value both come from your email provider — you never make these up. - DMARC — Name
_dmarc. Value starts withv=DMARC1. Start atp=noneso you monitor before you enforce.
If you want the conceptual picture of how the three fit together before you touch DNS, read the SPF, DKIM, and DMARC explainer first. This article is the hands-on Cloudflare walkthrough.
Where DNS records live in Cloudflare#
Log in to the Cloudflare dashboard and select the domain you want to configure — Cloudflare calls each domain a zone. In the left sidebar, open DNS → Records. That single screen holds every DNS record for the domain, and the blue Add record button at the top is where all three of these entries begin. When you click it, set Type to TXT for each one.
Cloudflare periodically redesigns its dashboard, so the exact left-nav grouping and button labels may have moved by the time you read this. The constant is the shape of the task: once you have selected your domain, look for a DNS or Records area, then add a record of type TXT. If your screen doesn't match this description exactly, that's the section to hunt for.
One prerequisite that trips people up: these records only take effect if your domain is actually using Cloudflare's nameservers. If you registered the domain elsewhere and only pointed a subdomain or a proxy at Cloudflare, the authoritative DNS may still live at your registrar — in which case records added here do nothing. Confirm the domain's status shows as active in Cloudflare before you start.
Setting up SPF, DKIM, and DMARC in Cloudflare#
Here is the whole job at a glance — the same three rows you'll create, with the Name field Cloudflare expects and where each value originates.
| Record | Type | Name in Cloudflare | Value comes from |
|---|---|---|---|
| SPF | TXT | @ | Your senders — build it with the SPF generator; starts v=spf1 |
| DKIM | TXT (sometimes CNAME) | selector._domainkey | Your email provider — selector + public key |
| DMARC | TXT | _dmarc | The DMARC generator; starts v=DMARC1, begin at p=none |
The sections below take each one in turn.
Adding your SPF record#
Click Add record, set Type to TXT, and in the Name field enter
@. In Cloudflare, @ is shorthand for the root (apex) of the zone — the bare
domain itself — which is exactly where SPF has to live. You can also type the
full domain and Cloudflare will normalize it, but @ is the idiomatic entry.
Paste your SPF string into the Content field. A single-sender example looks like this:
Type:    TXT
Name:    @
Content: v=spf1 include:_spf.google.com ~all
The include: mechanisms are the piece that varies — each sending service
(Google Workspace, Microsoft 365, your ESP, your CRM) tells you which one to add.
The critical Cloudflare-agnostic rule: a domain may have only one SPF record.
If you already have a v=spf1 TXT record at @ and you need to authorize another
sender, edit the existing record and add the new include: to it — do not
create a second SPF record, because two v=spf1 records at the root invalidate
each other. If you're combining several senders into one line, the
SPF record generator assembles a valid single
record for you. Leave TTL on Auto unless you have a specific reason to
change it.
Adding your DKIM record#
DKIM is the one record you can't hand-write, because both halves come from your
email provider: a selector (a short label like google, s1, k1, or
selector1) and a public key (a long string beginning v=DKIM1; k=rsa; p=…). Generate or copy those from your provider's admin console first.
In Cloudflare, add a TXT record and set the Name field to the selector
followed by ._domainkey — for example google._domainkey. Do not append
your domain; Cloudflare adds the zone name automatically, and typing it yourself
produces a doubled hostname like google._domainkey.example.com.example.com.
Paste the provider's key into Content exactly as given:
Type:    TXT
Name:    google._domainkey
Content: v=DKIM1; k=rsa; p=MIGfMA0GCSqGSIb3DQ...
Two Cloudflare notes. First, some providers hand you a CNAME for DKIM instead
of a TXT record (this is common with ESPs that rotate keys for you). If yours
does, choose Type: CNAME and paste the target hostname they supply rather than
a v=DKIM1 value — follow whichever record type your provider specifies. Second,
DKIM keys are long, and long TXT values used to need manual splitting into quoted
chunks on some DNS hosts. Cloudflare handles the length for you, so paste the
whole key as one value and don't add your own quotes or line breaks.
Adding your DMARC record#
Add one more TXT record. In the Name field enter _dmarc — again, just
_dmarc, not _dmarc.example.com. The value tells receivers what to do with mail
that fails authentication and where to send you reports. Start in monitoring mode:
Type:    TXT
Name:    _dmarc
Content: v=DMARC1; p=none; rua=mailto:dmarc@example.com
The p=none policy enforces nothing yet — it simply switches on the daily
aggregate reports that make a safe rollout possible. Build the value with the
DMARC record generator so the tags are
well-formed, then publish it and leave it at p=none while you read what comes
back. When the reports show every legitimate sender authenticating, step the
policy up to quarantine and then reject. The full sequence — and how to read
those XML reports — is covered in
how to set up DMARC and
how to read DMARC reports. Publishing p=none
plus SPF and DKIM is also the baseline the
Google and Yahoo sender requirements
demand of bulk senders.
The orange cloud and TXT records#
New Cloudflare users often worry about the orange-cloud proxy toggle — the setting that routes traffic through Cloudflare. It doesn't apply here. The proxy only appears for records that resolve to an address (A, AAAA, and CNAME records); TXT records are always DNS only and show a grey cloud with no toggle to flip. That's correct and expected. SPF, DKIM, and DMARC are pure DNS lookups, so there is nothing to proxy and nothing you can misconfigure on that front. If you added a DKIM CNAME, you may see an orange-cloud option on it — set that one to DNS only (grey) so the target resolves cleanly for the receiving mail server.
Cloudflare's other advantage is speed. Its DNS network propagates changes unusually fast — new or edited records are typically live within a minute or two worldwide, rather than the "up to 48 hours" warning you'll see quoted for DNS in general. In practice you can add a record and check it almost immediately, though it's still worth giving it a few minutes before you troubleshoot a record that looks wrong.
Verify your records#
Once all three are published, confirm they resolve and pass. Run your domain
through the SPF, DKIM, and DMARC checker — it
reports whether each record is present, syntactically valid, and reachable. Then
send a test message to a Gmail account and open Show original: you want to see
spf=pass, dkim=pass, and dmarc=pass. If SPF fails, re-check that you have a
single v=spf1 record and that the sender's include: is in it. If DKIM fails,
the usual culprit is a selector typo in the Name field or a domain accidentally
appended to it. If DMARC isn't found, make sure the Name is exactly _dmarc.
Remember the boundary: authentication proves who you are, not that you're a good sender. Clean, well-authenticated records get your mail considered for the inbox, but reputation and list quality decide placement — the email deliverability guide covers the rest of the levers.
Common mistakes on Cloudflare#
- A second SPF record. Adding a new
v=spf1TXT instead of editing the existing one. Merge every sender into a single record at@. - Appending the domain in the Name field. Typing
_dmarc.example.comorgoogle._domainkey.example.comproduces a doubled hostname. Enter just_dmarcandgoogle._domainkey; Cloudflare adds the rest. - Editing DNS at the wrong place. If your registrar still holds authoritative DNS, records added in Cloudflare won't apply. Confirm the domain uses Cloudflare's nameservers first.
- Inventing a DKIM value. The selector and public key must come from your email provider's console — there's nothing to generate on Cloudflare's side.
- Jumping DMARC straight to
p=reject. Publishp=none, watch the reports, then tighten. Enforcing before monitoring can send your own mail to spam.
Frequently asked questions#
Do I need to turn off the orange cloud for email records in Cloudflare?#
There's nothing to turn off for SPF, DKIM, or DMARC. Those are TXT records, and Cloudflare marks TXT records as DNS only automatically — the orange-cloud proxy toggle doesn't even appear for them. The only case where the proxy setting shows up is if your provider gave you a CNAME for DKIM; in that case set it to DNS only (grey cloud) so it resolves as a plain DNS record.
What do I put in the Name field for SPF, DKIM, and DMARC in Cloudflare?#
Enter @ for SPF (the root domain), <selector>._domainkey for DKIM (for
example google._domainkey, using the selector your provider gave you), and
_dmarc for DMARC. In every case, do not append your domain name — Cloudflare
adds the zone automatically, and typing it yourself creates a doubled hostname
that won't resolve.
How long do DNS changes take to propagate on Cloudflare?#
Usually a minute or two. Cloudflare's DNS network updates very quickly, so new or edited records are typically live worldwide almost right away — far faster than the "up to 48 hours" figure often quoted for DNS. It's still sensible to wait a few minutes before troubleshooting, and to re-check with a validator rather than assuming a fresh record is wrong.
Can I manage SPF, DKIM, and DMARC in Cloudflare if my domain is registered elsewhere?#
Yes, as long as the domain is using Cloudflare's nameservers. You can keep a domain registered at another registrar and still run its DNS through Cloudflare — that's a common setup. But if authoritative DNS still lives at the registrar, add the records there instead, because records published in Cloudflare only take effect once Cloudflare is the authoritative DNS host for the domain.
With SPF, DKIM, and DMARC live in Cloudflare, you've earned the right to be considered for the inbox — now make sure the list behind those records deserves it. The free email checker catches dead domains and typos before they bounce, and the rest of the free tools help you keep your authentication and list hygiene in shape.