Namecheap is one of the most popular places to register a domain, so for a lot
of senders it is also where they first set up SPF, DKIM, and DMARC. The
reassuring part is that all three are ordinary DNS TXT records, and Namecheap
gives you a plain form for adding them under the Advanced DNS tab. The only
thing that reliably trips people up is the Host field — what to type for a
root-level SPF record versus a _dmarc policy versus a DKIM selector. This guide
walks through where each record lives in Namecheap's DNS editor and exactly what
goes in each field, without touching the record values themselves, which come
from your email provider.
The short answer#
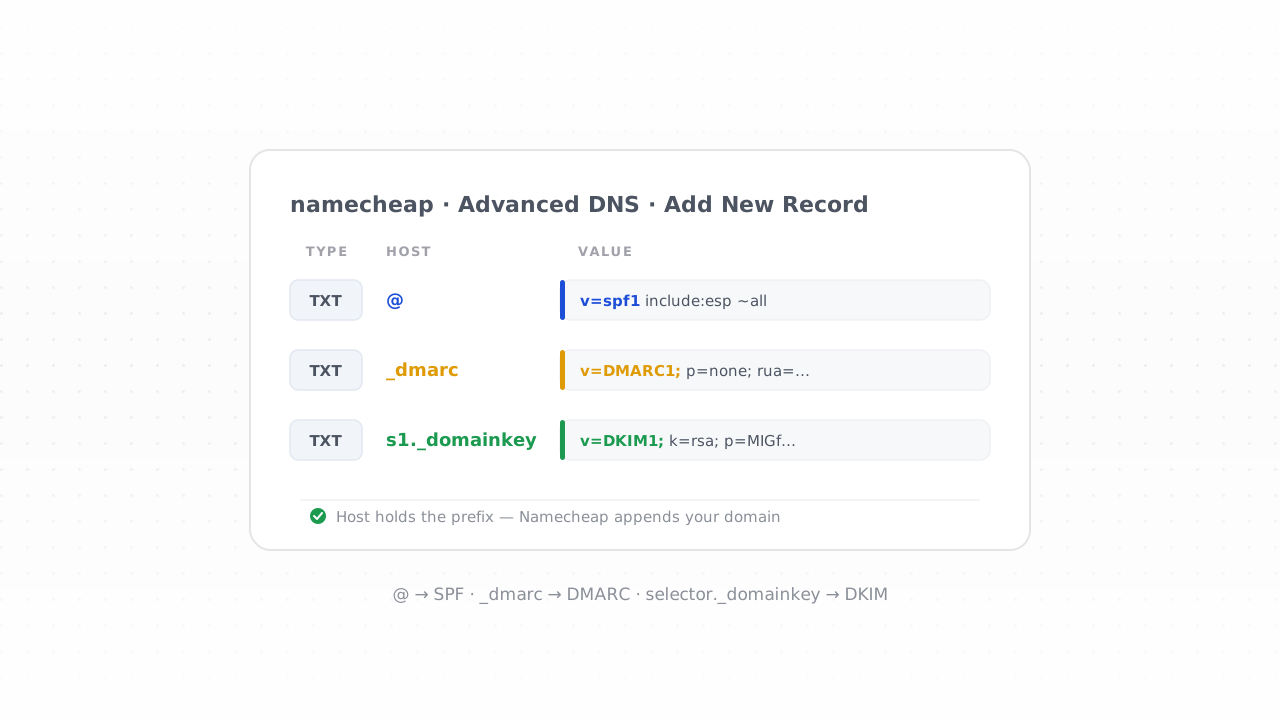
In Namecheap you add all three records the same way: Domain List → Manage → Advanced DNS → Add New Record → TXT Record, then fill in the Host and Value. What differs between the three is only the Host field:
- SPF — Host
@(the root domain); the value starts withv=spf1. - DKIM — Host
<selector>._domainkey(your email provider gives you the selector); the value starts withv=DKIM1. - DMARC — Host
_dmarc; the value starts withv=DMARC1.
Namecheap appends your domain to whatever you put in the Host field, so you type only the prefix — never the full hostname. Save each record, wait for propagation, then verify. The rest of this guide covers each step in detail, including how to find the record values without guessing at them.
Before you start: is Namecheap actually running your DNS?#
This is the check that saves the most wasted time. The Advanced DNS tab only controls your records if the domain is using Namecheap BasicDNS — the default nameservers that ship with a Namecheap registration. If you have pointed the domain's nameservers at another provider (Cloudflare, your web host, a managed DNS service), Namecheap is no longer answering DNS queries for that domain, and any TXT records you add on the Advanced DNS tab are simply ignored. In that case you add the records wherever your nameservers actually live.
To check, open the domain's management page and look at the Nameservers setting. If it reads "Namecheap BasicDNS" (or Namecheap Web Hosting DNS), you are in the right place and the Advanced DNS tab is live. If it shows "Custom DNS" with someone else's nameservers listed, add your SPF, DKIM, and DMARC records at that provider instead.
Where Namecheap keeps your DNS records#
Once you have confirmed Namecheap runs your DNS, the records live in one place. Sign in, open your Domain List from the account dashboard, find the domain, and click Manage. On the management screen, switch to the Advanced DNS tab. Under the Host Records section you'll see an Add New Record button. Click it, and set the record Type to TXT Record.
Each TXT record you add in Namecheap has the same handful of fields:
- Type — set to
TXT Recordfor all three of SPF, DKIM, and DMARC. (DKIM is the one exception where some providers hand you a CNAME instead; more on that below.) - Host — the prefix that sits in front of your domain. This is the field that
differs per record:
@for the root,_dmarcfor DMARC,<selector>._domainkeyfor DKIM. Namecheap adds.yourdomain.comfor you, so never type the full hostname here. - Value — the record string itself, pasted exactly as your generator or email provider gives it.
- TTL — how long resolvers cache the record.
Automaticis fine; there is no need to change it.
You do not need to wrap the Value in quotation marks — Namecheap stores the TXT data and handles the quoting for you. Adding your own quotes is a common cause of a record that looks right but fails to validate.
Adding your SPF record in Namecheap#
SPF is the record that lists which servers are allowed to send mail for your
domain, and in Namecheap it always lives at the root. Add a new TXT record,
set Host to @, and paste your SPF string into Value. A typical record
looks like this:
v=spf1 include:spf.your-esp.com ~all
The include: mechanism authorises your email provider's sending servers, and
the ~all at the end soft-fails everything else (-all hard-fails it). Don't
copy the example above verbatim — the includes depend entirely on which services
send your mail. Build the exact string with the
SPF record generator, which assembles the includes
for your providers into a single valid record.
That word single matters. A domain may publish only one SPF record. If a
second TXT record at the root also starts with v=spf1, receivers treat the SPF
as broken and both are effectively void. This bites Namecheap users
specifically: turning on Namecheap Private Email can add its own SPF record
automatically, so if you later send through a separate ESP you must merge the
two — combine every provider's include: into one record — rather than adding a
second one. When in doubt, keep exactly one line starting with v=spf1 at Host
@.
Adding your DKIM record in Namecheap#
DKIM is where the Host field looks unfamiliar, but the rule is simple. Your email
provider gives you a selector — a short label like s1, k1, google, or a
random string — and the public key value. In Namecheap you put the selector plus
._domainkey in the Host field, and the key in the Value:
Host:   s1._domainkey
Value:  v=DKIM1; k=rsa; p=MIGfMA0GCSq...
Because Namecheap appends your domain, a Host of s1._domainkey becomes the full
record name s1._domainkey.yourdomain.com, which is exactly where receivers look
for it. The selector and the long p= key are not something you invent — they
are generated by your email provider (Google Workspace, Microsoft 365, your ESP)
when you enable DKIM signing. Copy them from that provider's admin console and
paste them in unchanged.
One Namecheap-specific wrinkle: some providers publish DKIM as a CNAME rather
than a TXT record, so that they can rotate keys for you. If your provider gives
you a "points to" or "target" hostname instead of a v=DKIM1 string, set the
record Type to CNAME Record in Namecheap, put the selector host on the left
and the provider's target on the right, and skip the TXT format. Follow whatever
record type your provider specifies.
Adding your DMARC record in Namecheap#
DMARC is the policy layer that ties SPF and DKIM to the visible "From" address and
tells receivers what to do with mail that fails. It lives at the fixed host
_dmarc. Add a TXT record, set Host to _dmarc, and paste your policy into
Value:
v=DMARC1; p=none; rua=mailto:dmarc@yourdomain.com
Namecheap turns that Host into _dmarc.yourdomain.com, the one and only place a
DMARC record is read from. As with SPF, there is exactly one DMARC record per
domain — a second _dmarc TXT invalidates both.
Note the p=none. That is deliberate, and it is the single most important part
of a safe rollout. p=none means "monitor only" — receivers take no action on
failing mail and simply send you reports — so publishing it changes nothing about
how your mail is delivered while switching on the aggregate reports that let you
see every source sending as your domain. Build the record with the
DMARC record generator, start at p=none, and
only tighten to quarantine and then reject once the reports are clean. The
full sequence, including how to read what comes back, is covered in the
step-by-step DMARC setup guide and the companion on
how to read DMARC reports.
After you save: propagation and verification#
Namecheap usually applies Advanced DNS changes within about half an hour, but DNS
propagation across the wider internet can take longer — allow up to 48 hours
before concluding something is wrong, especially if you edited an existing record
whose old value was cached with a long TTL. If you set TTL to Automatic, this
is rarely a problem for new records.
Once the records are live, confirm they resolve and parse correctly rather than assuming. The SPF, DKIM, and DMARC checker reads all three back for your domain and flags the usual problems — a missing record, a duplicate SPF, a DKIM selector that returns nothing, a malformed DMARC tag. It is also the fastest way to prove your changes took effect before you rely on them.
Common Namecheap pitfalls#
A handful of mistakes account for most Namecheap authentication tickets:
- Typing the full hostname in Host. Entering
yourdomain.comor_dmarc.yourdomain.comproduces a doubled name like_dmarc.yourdomain.com.yourdomain.com. Use the prefix only:@,_dmarc, or<selector>._domainkey. - Two SPF records. Whether from Private Email plus an ESP, or two manual
entries, a second root TXT starting
v=spf1breaks SPF. Merge into one. - Wrong nameservers. If the domain is on Custom DNS, Advanced DNS records do nothing — add them at your real DNS host.
- Adding quotation marks by hand. Namecheap quotes TXT values for you; extra quotes corrupt the record.
- Inventing DKIM values. The selector and key must come from your email provider. There is no generic DKIM record to paste.
- Rushing DMARC to
p=reject. Skipping the monitoring phase is how you send your own legitimate mail to spam. Start atp=none.
Getting all three right is exactly what the 2024 mailbox-provider rules ask for — see the Google and Yahoo sender requirements for who needs which records at what volume, and remember that authentication is the entry ticket, not the whole game: it protects your sender reputation but doesn't earn placement on its own.
Frequently asked questions#
What do I put in the Host field for SPF, DKIM, and DMARC in Namecheap?#
Only the prefix, because Namecheap appends your domain automatically. Use @ for
SPF (the root domain), _dmarc for DMARC, and <selector>._domainkey for DKIM —
where the selector is the label your email provider gave you, for example
s1._domainkey or google._domainkey. Never type the full hostname; entering
_dmarc.yourdomain.com in the Host field produces a doubled name that won't
resolve.
Why isn't my record working after I added it in Namecheap?#
Work through the usual causes in order. First, confirm the domain is on Namecheap BasicDNS and not Custom DNS pointing elsewhere — Advanced DNS records are ignored if another provider runs your nameservers. Second, check you typed the Host prefix only, with no full domain and no manually added quotes. Third, make sure there is exactly one SPF and one DMARC record. Finally, allow for propagation — up to 48 hours — and run the SPF, DKIM, and DMARC checker to see what actually resolves.
Do I need to use Namecheap BasicDNS to add these records?#
You need to add the records wherever your domain's nameservers point. If the domain uses Namecheap BasicDNS, the Advanced DNS tab is the right place. If you have moved DNS to another provider via Custom DNS, add SPF, DKIM, and DMARC there instead — the records are the same, only the editor differs. Adding them on Namecheap's Advanced DNS tab has no effect when Namecheap isn't answering DNS for the domain.
Can I have more than one SPF record in Namecheap?#
No — a domain may publish only one SPF record, and this is a common Namecheap
trip-up. If you enabled Namecheap Private Email, it may have added its own SPF
record already, so adding a second one for your ESP breaks both. Instead, merge
every provider's include: mechanism into a single record at Host @. The SPF
record generator builds one valid combined record for all the services you send
through.
Once SPF, DKIM, and DMARC are live in Namecheap, run the free SPF, DKIM, and DMARC checker to confirm all three resolve — then clean the list behind them with the free email checker, because a perfectly authenticated domain still lands in spam if it's mailing dead addresses.