Setting up SPF, DKIM, and DMARC in GoDaddy is the same three DNS records you
would add with any registrar — the only thing that changes is where GoDaddy
tucks its DNS editor and what it expects you to type in the Name field. All
three are ordinary TXT records: SPF sits at your root domain, DKIM at a
selector your email provider gives you, and DMARC at _dmarc. This guide walks
through GoDaddy's DNS management screen step by step, explains the @ shorthand
that trips people up, and points you to the generators that produce the actual
record values.
The short answer#
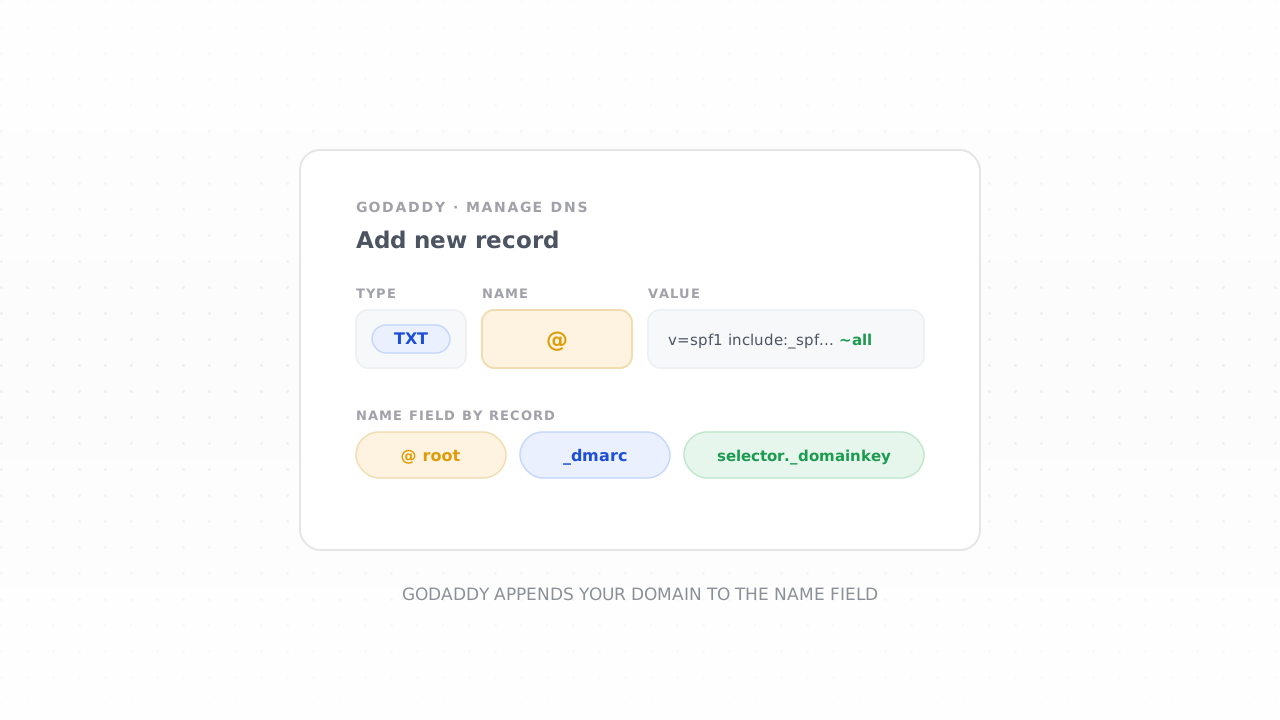
In GoDaddy you add all three records the same way: open the domain's DNS / Manage DNS page, choose Add New Record, and pick TXT as the type. What differs is the Name (host) field:
- SPF — Name
@(GoDaddy's shorthand for the root domain), value startsv=spf1. Publish exactly one SPF record. - DKIM — Name
<selector>._domainkey(the selector comes from your email provider), value is the public key your provider hands you. - DMARC — Name
_dmarc, value startsv=DMARC1and should begin atp=none.
GoDaddy automatically appends your domain to whatever you type in Name, so you
enter _dmarc — never _dmarc.yourdomain.com. The record values themselves are
identical no matter who hosts your DNS; if you want the correct SPF or DMARC
string for your setup, build it with the
SPF record generator and the
DMARC record generator and paste the result in.
Finding the DNS editor in GoDaddy#
Before you can add anything, you need to reach the right screen. GoDaddy has redesigned this area more than once, so the exact wording and menu path may have moved since this was written — but the destination is always the same: the DNS records list for your domain.
Sign in to your GoDaddy account and open your Domain Portfolio (older accounts may call it My Products). Find the domain you send mail from and open its settings, then look for DNS or Manage DNS. That lands you on the DNS Management page, which shows a table of existing records — usually your A record, a CNAME or two, your MX records, and any TXT records already present. This table is where SPF, DKIM, and DMARC all live.
The Name field: GoDaddy's @ convention#
This is the single detail that causes the most confusion, so it is worth getting straight before you add a record. GoDaddy asks for a Name (sometimes labelled Host), and it always appends your domain to whatever you enter. You supply the part in front of your domain, not the full hostname.
| Record | What to type in Name | Resulting hostname |
|---|---|---|
| SPF | @ | yourdomain.com (the root) |
| DKIM | selector._domainkey | selector._domainkey.yourdomain.com |
| DMARC | _dmarc | _dmarc.yourdomain.com |
The @ symbol is GoDaddy's shorthand for "the domain itself" — the apex or root
— which is exactly where SPF must live. For DMARC you enter _dmarc and let
GoDaddy add the rest; typing the full _dmarc.yourdomain.com would produce the
wrong hostname _dmarc.yourdomain.com.yourdomain.com and the record would never
be found. The same logic applies to the DKIM selector: enter
google._domainkey (or whatever selector your provider specifies), not the
whole address.
Adding your SPF record in GoDaddy#
SPF (Sender Policy Framework) lists the servers allowed to send mail for your domain. On the DNS Management page:
- Select Add New Record and choose TXT as the type.
- In Name, enter
@. - In Value, paste your SPF string. It always starts with
v=spf1and ends with anallmechanism — for example:
v=spf1 include:_spf.google.com include:sendgrid.net ~all
- Leave TTL at the default (GoDaddy usually offers 1 hour / 3600 seconds, which is fine).
- Save.
The include: entries are specific to the services you send through — your email
platform's documentation lists the exact one to use, and the
SPF record generator assembles them into a single
valid string for you. The ~all at the end is a soft-fail; -all is a hard-fail
that rejects unauthorized senders outright.
Adding your DKIM record in GoDaddy#
DKIM (DomainKeys Identified Mail) publishes a public key that lets receivers verify your messages were not forged or altered. You do not write a DKIM value yourself — your email provider generates the key pair and gives you the exact record to publish. Your job in GoDaddy is only to copy it in at the right name.
- Get the DKIM record from your email provider — in Google Workspace it is under Apps → Gmail → Authenticate email; in Microsoft 365 it is in the Defender portal; most email platforms have a "DKIM" or "domain authentication" settings page. They give you a selector and a value.
- In GoDaddy, Add New Record, type TXT.
- In Name, enter the selector followed by
._domainkey— for examplegoogle._domainkey. - In Value, paste the public key exactly as provided. It is a long string and typically looks like:
v=DKIM1; k=rsa; p=MIGfMA0GCSqGSIb3DQEBAQUAA4GNADCBiQ...
- Save.
The long DKIM value is where GoDaddy's editor can feel awkward — the field is small and the key runs off-screen. Paste the whole thing in one go rather than typing it, and take care not to introduce line breaks or trailing spaces, which silently break the key.
Adding your DMARC record in GoDaddy#
DMARC (Domain-based Message Authentication, Reporting and Conformance) ties SPF
and DKIM to your visible "From" address and tells receivers what to do when a
message fails. It lives at _dmarc.
- Add New Record, type TXT.
- In Name, enter
_dmarc— nothing more. GoDaddy appends your domain. - In Value, paste a starting DMARC policy:
v=DMARC1; p=none; rua=mailto:dmarc@yourdomain.com
- Save.
The p=none policy is deliberate: it enforces nothing yet and simply switches on
the daily aggregate reports sent to your rua address. That is the correct place
to start every time. Build your record — including the reporting address and any
optional tags — with the
DMARC record generator, then follow the
safe DMARC rollout guide to move from p=none to
quarantine and finally reject once the reports confirm your legitimate mail
authenticates.
A note on TTL and GoDaddy's editing quirks#
GoDaddy's TTL dropdown offers a few presets — commonly a half hour, one hour, and one day — plus a custom option. The default of one hour is sensible; a shorter TTL only helps if you expect to change a record soon and want the update to propagate faster. Leave it at the default unless you have a reason not to.
A couple of GoDaddy-specific behaviours to expect: edits are made inline in the records table (look for an edit or pencil control on each row), and saving a new record can take a few minutes to appear. DNS changes then propagate more widely over the following minutes to a few hours — occasionally up to 48, though it is usually far quicker. If a record does not seem to take, re-open it and check for an accidental duplicate, a full hostname typed where GoDaddy wanted just the prefix, or a stray space in the value.
Verify your records, then enforce#
Once all three records are saved, confirm they resolve before you trust them. Run your domain through the SPF, DKIM, and DMARC checker — it reads back what is actually published, flags a missing or duplicate SPF record, and confirms your DMARC policy parses. Because DNS caches, give GoDaddy a little time and re-check if a freshly added record has not surfaced yet.
Getting all three published is what satisfies the Google and Yahoo sender requirements that have applied to bulk senders since 2024. But authentication only proves who you are — it does not, on its own, land you in the inbox. A perfectly authenticated message from a domain with a poor sender reputation or a list full of dead addresses still gets filtered. Treat these records as the entry ticket, then do the work that earns placement: keep bounces and complaints low and mail people who actually want to hear from you. Once DMARC reports start arriving, the guide to reading DMARC reports explains what the daily XML is telling you.
Frequently asked questions#
What do I put in the GoDaddy Name field for SPF, DKIM, and DMARC?#
For SPF, enter @, which is GoDaddy's shorthand for your root domain. For DMARC,
enter _dmarc. For DKIM, enter your provider's selector followed by
._domainkey, such as google._domainkey. In every case GoDaddy appends your
domain automatically, so you type only the part in front of it — never the full
hostname like _dmarc.yourdomain.com.
Why does my SPF record fail after I added a new one in GoDaddy?#
Almost always because there are now two SPF records at your root domain. A domain
may publish only one TXT record starting with v=spf1; a second one makes SPF
fail entirely. Edit the existing record and merge the new include: into it
rather than adding a separate record. The
SPF record generator helps you combine multiple
senders into a single valid string.
Do I create a TXT or a CNAME record for DKIM in GoDaddy?#
It depends on what your email provider gives you. Many providers, including Google Workspace, supply a TXT record you paste in as-is. Others, such as Microsoft 365, supply CNAME records that point back to their servers. Add exactly what your provider specifies at the selector name they give you — choose TXT for a TXT value and CNAME for a CNAME target, and do not convert between them.
How long do GoDaddy DNS changes take to work?#
New and edited records usually appear in GoDaddy within a few minutes and propagate across the internet within minutes to a few hours, occasionally up to 48 hours because of DNS caching. If a record has not taken after a reasonable wait, re-check it for a duplicate, a full hostname typed where only the prefix belonged, or a stray space, then confirm with the SPF, DKIM, and DMARC checker.
With SPF, DKIM, and DMARC live in GoDaddy, your domain is authenticated — but a trusted identity only earns the inbox when the list behind it is clean. Run your list through the free email checker to strip dead addresses and typos before they bounce, or explore the full set of free deliverability tools to keep every record and every send in good standing.