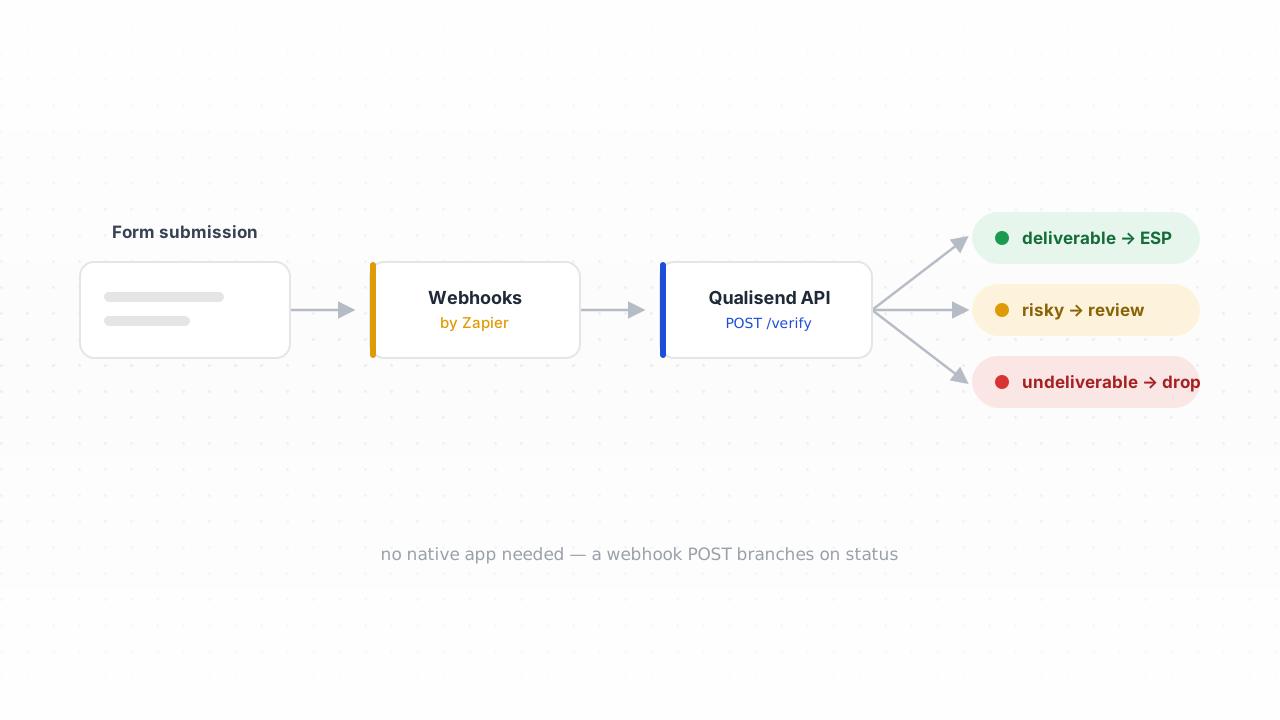
You can verify emails with Zapier today, even though there is no native Qualisend Zapier app yet. The trick is to stop looking for a branded connector and use the generic Webhooks by Zapier action instead: your form or CRM fires a trigger, Zapier POSTs the new address to the Qualisend API, and a Filter or Paths step branches on the verdict — so only deliverable addresses flow on to your email tool and risky ones get parked for review. This guide builds that Zap end to end.
The short answer#
There is no native app to install right now (it is on the roadmap), so the
supported pattern is a three-step Zap: a trigger (new form submission, new
lead, new row), a Webhooks by Zapier → Custom Request (POST) action that calls
the verification API with the email, and a Filter or Paths step that reads
the returned status and decides what happens next. Keep your API key in the
webhook headers — never in a public form — and default to letting an address
through if the webhook ever errors, so a transient hiccup never drops a real lead.
Two ways to verify emails with Zapier#
Before wiring anything up, pick the pattern that matches how fresh the data needs to be:
- Real-time, per-submission (a Zap). Every new address is verified the moment it arrives and routed on the spot. This is the main subject of this guide and the right choice when the verdict changes what happens next — gating a double-opt-in email, tagging a lead, or skipping a fake signup.
- Batch, after the fact (a CSV). Let submissions pile up in a sheet or your ESP, export them periodically, and run them through a bulk verification job. Simpler, cheaper per address, and a better fit when you just need a clean list before a send rather than an instant decision.
Most teams end up doing both: a Zap on the live intake, plus a monthly list clean to catch addresses that have gone stale since they signed up.
Step 1: the trigger#
Start the Zap with whatever captures the address. Zapier has native triggers for
most form and CRM tools — "New Submission" in a form app, "New Lead" in a CRM,
"New Spreadsheet Row" in Google Sheets. Whatever you pick, the important output is
a field holding the email address, which later steps reference as a merge token
like {{1.email}}.
The exact same webhook action works no matter what fires it, so the pattern in this guide is identical whether you are wiring up Typeform, a CRM, or a sheet — see verify emails from Typeform for a trigger-specific walkthrough that then hands off to the steps below.
Step 2: POST the address with Webhooks by Zapier#
Add an action step and choose Webhooks by Zapier, then the Custom Request event. This is the step that actually calls Qualisend. Configure it like this:
| Field | Value |
|---|---|
| Method | POST |
| URL | your verification endpoint — e.g. https://api.qualisend.com/v1/verify (check the API reference for the exact path) |
| Data Pass-Through? | No |
| Data | JSON body with a single email key mapped to the trigger's email field |
| Headers | Authorization: Bearer YOUR_API_KEY and Content-Type: application/json |
In the Data box, Zapier lets you type raw JSON and drop the trigger's email token into it. The body you are sending is just:
{ "email": "{{1.email}}" }
And the request Zapier fires on your behalf looks like this — the placeholders are yours to fill in from the developer docs, which list the exact endpoint and show the request in several languages:
POST https://api.qualisend.com/v1/verify
Authorization: Bearer YOUR_API_KEY
Content-Type: application/json

{ "email": "jane@example.com" }
Use a scoped key minted for this Zap rather than a full-access key, so if the Zap history ever leaks the key can only verify, nothing else. Never put the key in the form itself or in any client-side field — it belongs only in the webhook headers, which run server-side inside Zapier.
When you click Test action, Zapier shows the response body. You will get back
a status, a reason code, a 0–100 score, and a set of sub_flags. A
deliverable address comes back looking roughly like this:
{
  "status": "deliverable",
  "reason": null,
  "score": 95,
  "sub_flags": { "disposable": false, "role": false, "free": false, "catch_all": false }
}
Those field names are what the next step branches on, so note how Zapier labels
them — it usually flattens them to tokens like status and sub_flags catch_all.
For the full picture of what each status means and how the pipeline arrives at it,
see how email verification works.
Step 3: branch on the verdict#
A verification result you do not act on is wasted credit. The whole point is to route addresses differently, and Zapier gives you two tools for that.
Option A — a Filter (simplest). If all you want is "only keep good addresses," add a Filter by Zapier step after the webhook. Set the condition to:
- Status (text) exactly matches
deliverable
Anything that is not deliverable stops the Zap right there, so only confirmed
addresses reach your downstream action (adding to your ESP, creating the contact,
sending the welcome email). Simple, but blunt — it treats risky, unknown, and
undeliverable the same way, when you often want to handle them differently.
Option B — Paths (route each outcome). Paths by Zapier — available on paid Zapier plans — lets you fork into separate branches, each with its own condition and its own follow-up actions:
| Path condition | What to do |
|---|---|
Status is deliverable | Add the contact to your ESP or CRM and continue the funnel. |
Status is risky or unknown | Add to a "needs review" list or tag it — don't hard-drop it. This bucket includes catch-all domains that can't be probed cleanly. |
Status is undeliverable | Don't add it anywhere. Optionally log it to a sheet so you can spot a broken form field or a bad traffic source. |
You can branch on the sub-flags too. If your product is reputation-sensitive, add
a condition that routes any address where sub_flags disposable is true into
the review path even when the status is otherwise fine — the same call on
disposable, role, and free addresses that
the role, disposable, and free breakdown walks through. Paths
evaluate top to bottom, so put your strictest branch first.
Don't let the webhook block a good lead#
One rule matters more than any branch: fail open. If the webhook step errors —
the API is briefly slow, a plan limit is hit, a network blip — you do not want the
whole Zap to die and silently swallow a real signup. In Zapier, open the webhook
action's settings and turn on "Continue on error" (sometimes shown as an
auto-replay / error-handling option on your plan). Then add a fallback so an
address with no verdict is treated as unknown and kept for later review rather
than dropped.
A verification API is a quality filter, not an authentication gate. Blocking a paying customer because of a transient outage is a far worse outcome than letting one questionable address through and catching it in your next list clean. The same fail-open principle underpins the serverless signup pattern, where a slow probe must never stall the form.
When a Zap is the wrong tool#
Zapier is glue, and glue has a cost: every verified address is a task, and a per-submission webhook can get expensive at volume or feel like overkill when you do not need an instant decision. Reach for the batch route instead when:
- You are cleaning a list that already exists — thousands of historical contacts, not new intake. Export them and run a single bulk job.
- Your volume is high enough that per-task pricing stings, and a nightly or weekly clean is fresh enough.
- You are on Zapier's free plan and can't use the premium Webhooks app.
For all three, skip the Zap: export the submissions to CSV from your form tool,
sheet, or ESP, and upload that file to Qualisend's bulk verifier. You get the same
status, score, and sub-flags per row, downloadable as a cleaned file you can
re-import. It is the lowest-effort way to keep a list healthy and your
bounce rate down without maintaining any
automation.
If you are weighing Zapier's webhook approach against calling the API directly from your own backend, the API comparison lays out the trade-offs — Zapier wins on speed-to-set-up, a direct integration wins on cost and control at scale.
Frequently asked questions#
Is there a native Qualisend app for Zapier?#
Not right now. Qualisend's native platform integrations are being rebuilt, so there is no branded app to search for in the Zapier directory yet — it is on the roadmap. Until it ships, the supported way to verify emails with Zapier is the generic Webhooks by Zapier action pointed at the Qualisend API, exactly as this guide describes. The webhook approach is also more flexible: you control the request, the headers, and the branching logic.
Do I need a paid Zapier plan?#
For the real-time Zap, effectively yes. Webhooks by Zapier is a premium built-in app, and multi-step Zaps and Paths require a paid Zapier tier, so the branch-on-verdict flow needs a paid plan. If you are on the free plan, use the CSV export and bulk-verify route instead — it needs no Zap and no premium app, just a file upload.
Which status should I let through to my email tool?#
Only deliverable for a strict gate. If you want to keep more addresses, allow
deliverable plus risky/unknown but route those into a separate,
lower-priority segment rather than your main flow — many risky results are
catch-all domains that may still deliver.
Always reject undeliverable, and consider branching on the disposable sub-flag
too if your product is reputation-sensitive.
How do I test the Zap before turning it on?#
Use Zapier's built-in Test action on the webhook step with a known-good
address and a known-bad one, and confirm the status field changes as expected —
then check that your Filter or Paths conditions route each to the right branch.
For quick one-off spot checks outside Zapier, paste an address into the
free email checker and compare the verdict to what your Zap
returns.
Ready to build it? Grab a scoped key and the exact request shape from the developer docs, sanity-check any address in the free email checker, and start on the free plan — 100 credits are enough to wire the whole Zap up and watch a bad address get filtered before it ever reaches your list.